An Exchange Resource Forest, also known as an "Exchange Resource Forest Topology", is a design approach used in Microsoft Exchange Server deployments. The main objective of an Exchange Resource Forest is to enhance security, simplify administration, and provide a dedicated environment for managing and hosting Exchange resources, particularly for organizations with complex requirements. Here are the key objectives and benefits:
· Security Isolation: In a typical Exchange deployment, user accounts and Exchange resources (such as mailboxes, distribution groups, etc.) coexist in the same Active Directory forest. In an Exchange Resource Forest topology, user accounts and Exchange resources are separated into different Active Directory forests. This isolation enhances security by reducing the attack surface and limiting access to critical resources.
· Simplified Administration: The Exchange Resource Forest allows organizations to dedicate one forest for managing Exchange resources. This specialized management environment can have its own set of administrative staff who focus solely on Exchange-related tasks. This separation simplifies administration and can lead to better resource allocation.
· Resource Forest for Multiple User Forests: In scenarios where an organization has multiple user forests (separate Active Directory forests containing user accounts), a single Exchange Resource Forest can be used to centralize and manage Exchange resources for all user forests. This simplifies the Exchange infrastructure in complex environments.
· Enhanced Security and Compliance: By separating user accounts from Exchange resources, the Exchange Resource Forest helps isolate sensitive data, such as email content and mailbox information. This separation can be beneficial for organizations with strict security or compliance requirements.
· Cross-Forest Mailbox Access: In environments where users from multiple organizations or forests need to access shared resources (such as meeting rooms or shared mailboxes), an Exchange Resource Forest facilitates cross-forest mailbox access while maintaining a level of administrative separation.
· Scalability and Performance: By distributing Exchange resources across different forests, organizations can potentially enhance scalability and performance. The Exchange Resource Forest design allows for more granular control over resource placement and allocation.
· Migration and Transition: The Exchange Resource Forest topology can be useful in migration scenarios, especially when organizations need to transition from one Exchange version to another, consolidate multiple Exchange environments and migrate entire Exchange environment to Exchange Online.
While an Exchange Resource Forest offers these advantages, it also introduces additional complexity in terms of design, administration, and maintenance. Organizations considering this topology should carefully evaluate their specific requirements and weigh the benefits against the added complexity and potential challenges. Additionally, the design considerations and best practices may evolve with updates to Exchange Server and related technologies. Always refer to the latest Microsoft documentation for the most current guidance. Once you have deployed Exchange Resource Forest it is very hard to roll-back or remove Exchange-Hybrid environment. Microsoft provides no supported or official guidance how to remove Exchange Resource Forest and how to rollback Exchange-Resource Forest deployment.
In this article I will demystify all aspects of Exchange Resource Forest deployment:
- Configuration
- Operations
- Decommissioning
Page navigation
Exchange Resource Forest configuration
On-Prem environment
Deployment of User and Resource Forest
Exchange resource forest deployment requires as least TWO domain controllers. Each forest has at least one domain controller and one Active Directory Site.
Installation of Domain-Controllers
Before you start with Resource Forest configuration, make sure that all your domain controllers have the same versions. You need at least Windows 2016 schema to configure and operate resource forest environment, because Exchange 2016 is the lowest recommended and supported Exchange version.
Creation of Resource Forest
Before you start with AD forest creation, make sure that you have planned enough domain controllers. For every AD site you will need at least two domain controllers for redundancy purpose. Every site may need its own Exchange-Server.
Read-Only domain controllers are not Supported!
Configuration of a forest trust
Forest trust is a mandatory requirement for operating of Exchange-Resource Forest. For this configuration you need to have Domain-Admin Service account in both forests.
Configuration of conditional forwarders
Open Server-Manager console and open DNS management console.
Create a conditional forwarder in each forest, so that your Domain-Members can resolve objects in another forest.
Configuration of two way forest trust
After configuration of Conditional forwarders, create a two-way forest trust in each of our forests.
Enter the full name of the forest you want to trust.
Create a forest-wide authentication so that every “allowed” user can login to another forest. You can setup permissions for every user from foreign forest, by using security groups.
Create a secure trust password, because it will by checked periodically for security purpose.
For additional information find the MS-KB article below:
Deployment of Microsoft Exchange 2019
Software installation requirements are depending on Exchange-Version and Windows Server version. So, in your case they may be different. Check exact documentation if you have any installation issues.
Here is the download link for Exchange 2019 CU13 installation ISO:
Here is the link for all system requirements for Exchange 2019:
Configuration of all Exchange prerequisites
# Windows Server feature installation Install-WindowsFeature NET-Framework-45-Features, RPC-over-HTTP-proxy, RSAT-Clustering, RSAT-Clustering-CmdInterface, RSAT-Clustering-PowerShell, Web-Mgmt-Console, WAS-Process-Model, Web-Asp-Net45, Web-Basic-Auth, Web-Client-Auth, Web-Digest-Auth, Web-Dir-Browsing, Web-Dyn-Compression, Web-Http-Errors, Web-Http-Logging, Web-Http-Redirect, Web-Http-Tracing, Web-ISAPI-Ext, Web-ISAPI-Filter, Web-Metabase, Web-Mgmt-Service, Web-Net-Ext45, Web-Request-Monitor, Web-Server, Web-Stat-Compression, Web-Static-Content, Web-Windows-Auth, Web-WMI, RSAT-ADDS Restart-Computer #.NET Framework 4.8 installation .\ndp48-x86-x64-allos-enu.exe /q /norestartRestart-Computer#Visual C++ Redistributable Packages for Visual Studio 2013 .\vcredist_x64.exe /q /restart
#Unified Communications Managed API 4.0 Runtime from Official Microsoft Download Center#URL rewrite module# Exchange Installation linkPreparation of schema and domain
.\setup /PrepareAD /organizationName:onpremtocloud /ActiveDirectorySplitPermissions:false /iacceptexchangeserverlicenseterms_diagnosticDataOn.\Setup /preparedomain /iacceptexchangeserverlicenseterms_diagnosticDataOn.\setup /PrepareSchema /iacceptexchangeserverlicenseterms_diagnosticDataOnInstallation of Exchange 2019 server mailbox role
Installation of Exchange 2019 mailbox service is dependent on number of mailboxes which should be hosted on it.
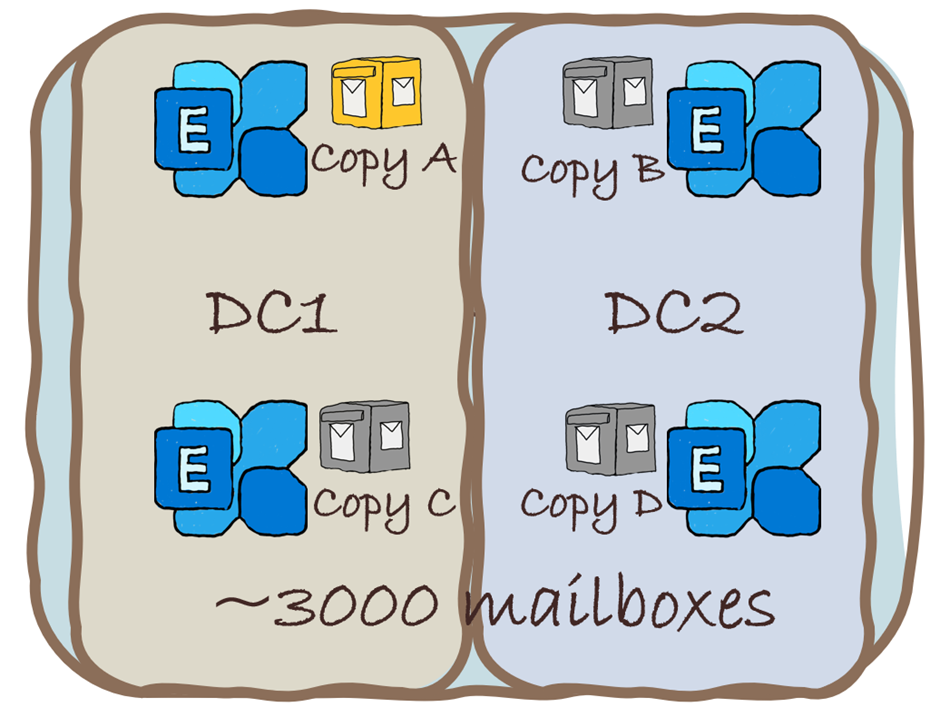
Microsoft Exchange 2019 best practice deployment is based on redundancy. You can buy cheap servers and build a high performance exchange environment with low budget and also safe money on Exchange operations and maintenance. Each “building block” contains 4 Exchange-Server which are part of a Distributiongroup.
Each mailbox is hosted on each Exchange-Server and has only 1 active copy. So if some of exchange-servers will have an issue you can simply reinstall it and copy all mailboxes as a copy on it via auto-provisioning.
Every DAG is spanned through 2 data centers for maximum site-resiliency. It is recommended to have at least two sites each DAG to enable shadow redundancy.
Outlook and user access performance is covered by MCDB. This technology is using dedicated SSD-Cache only for intensive access operations, like Outlook Index. It is caching the most common access requests for MCDB, so that you have always the best user experience.
Find the download link for Exchange-Installation ISO below:
Hybrid environment
You are planning to extend your on-prem environment with a M365 data center, or you are planning to migrate all your on-premises environment to M365.
In this case you need to setup a hybrid environment, which requires at least three additional components in your environment:
- M365 tenant
- ADFS service
- Azure AD Sync
Configuration of M365 tenant
If you are just starting with configuration of hybrid-environment and you simply need to deploy Exchange-Hybrid, I recommend at least M365 Business Premium subscription.
This is the “cheapest” subscription which has Security, Compliance and Mobile Device management features, to protect your cloud data from attackers, or unauthorized access.
You can simply register a trial version to test everything before you migrate your data to the cloud.
Before you can start with tenant creation, following prerequisites are required:
- An email address
- A valid telephone number
- A valid payment method
- A public domain
- A public certificate
I recommend to buy a “*” Wild-Card certificate, it does not need to be a very secure one. It needs to be issued by a public certificate authority.
M365 tenant configuration wizard, initial setup
You can find configuration wizard for M365 here:
Complete all required configuration steps.
After successful registration you can start to configure your M365 organization.
Configuration of a custom domain
During the initial setup, the wizard will ask you for a public domain. You can skip this part, but I recommend you configure it at the beginning.
If you skip the domain registration wizard, all services will be configured with the default onmicrosoft.com domain and it will be an additional effort to change it afterwards.
Validation of a custom domain
Microsoft wants to ensure that you can only add a public domain which you are really own. So you need to validate the ownership by adding additional DNS entries.
I recommend you to use the first option, because a txt record is populated nearly instant in your DNS zone and has no global time to live (TTL) dependency.
Goto your public domain provider portal. Select the right public domain and goto DNS zone management. Add a new TXT record with the name “@” and values which you will get from configuration wizard.
After successful verification, you can start to create users and mailboxes with your public domain, or just simply synchronize them from your on-premises environment.
Configuration of ADFS
ADFS is required to provide a smooth and secure user experience across the whole environment. Read my “Demystify Federation Provider” for additional information about User federation and federation provider.
Installation of an ADFS role
ADFS server needs to be deployed into user forest. Connection to the resource forest is provided through our Two-Way-Trust.
Ensure that you have additional DNS entries for your ADFS server like
- Enterpriseregistration
- ADFS
- STS
There three names are user in ADFS source-code and needs to be pointed to your ADFS server.
Select Active Directory Federation Services role from Windows Role installation menu.
Continue the role installation until it is finished and start with ADFS configuration.
Configuration of a certificate
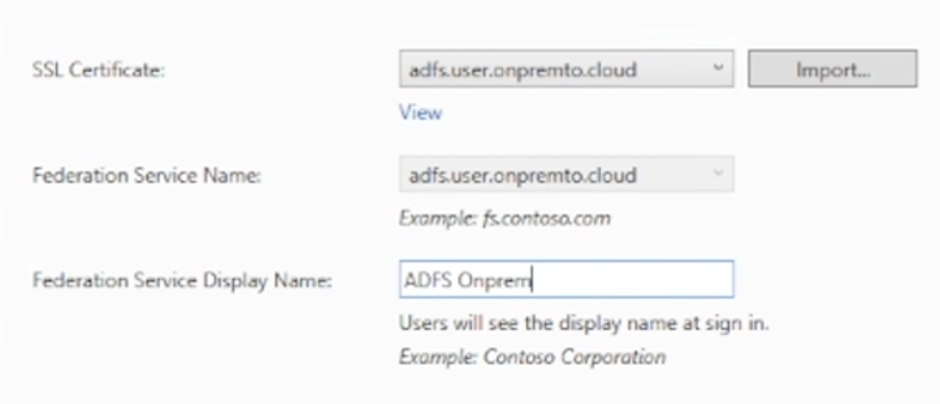
The most important part of ADFS is the name of your ADFS service and certificate. ADFS service name is not the same as your server name so you can safely use naming-convention of your enterprise.
For a hybrid-environment it is necessary to use a public certificate. You can also use a public * (wildcard) certificate.
Service Account
ADFS is requiring a Group Managed Service Account. Before you can setup gMSA you need to create KDS Root Key.
Add-KdsRootKey -EffectiveTime (get-date).AddHours(-10)After you have run the command you can simply create a new gMSA during ADFS configuration.
Configuration of Azure AD Sync
Azure AD sync is synchronizing all your Local AD object to Azure AD. It is not possible to run a hybrid environment without AAD-sync. If you want to manage Mailbox-Attributes like “proxyaddress” in a supported way, you need to install an Exchange-Server or Exchange-Management-Server.
Installation of AzureAD connect
Download the current version of AAD connect here.
Start installation by simply double-click the install file. We aware that you need Domain Admin and Global Admin permissions for a successful installation.
Select “Customize” installation type to be able to change additional synchronization options.
Configuration of a Multi-Forest sync
Connect all Active Directories which you want to sync to your tenant by simply adding a directory with an Domain Admin account.
Important: You can synchronize as many directories as you want. All write-back features are supported only into ONE forest. So install AAD-Sync connector only in your main forest, either you will have a lot of synchronization issues.
Make sure, that all domains from all your forests are verified, or you will not be able to use them in the cloud.
Select the attribute which should be used for login.
Following steps are Very Important
When you reach the step “Identifying users”: Select “User identities exist across multiple directories” and my them by using “ObjectSID”.
This setting will link all cross-forest objects with the ObjectGUID of the “Primary” forest to a “linked-object”.
Configuration of federation service
During AAD-Connector installation select Federation with AD FS. This step will enable your local federation service as authentication provider.
I would recommend you to enable following optional features:
- Password hash synchronization
o Enables a fast rollback of ADFS deployment. Gives you an opportunity to remove ADFS service and failover in case of ADFS failure.
- Password writeback
o Give you a possibility to reset password in the cloud for your local Accounts
- Group writeback
o Is synching “cloud only” groups to your local AD and you can change group membership directly in your local AD
During configuration of ADFS service you need to validate your ADFS farm configuration
As mentioned several times before, AAD connect will not accept any private certificates.
Select the name of your ADFS server
Make sure that you can resolve it from your AAD-Connect server.
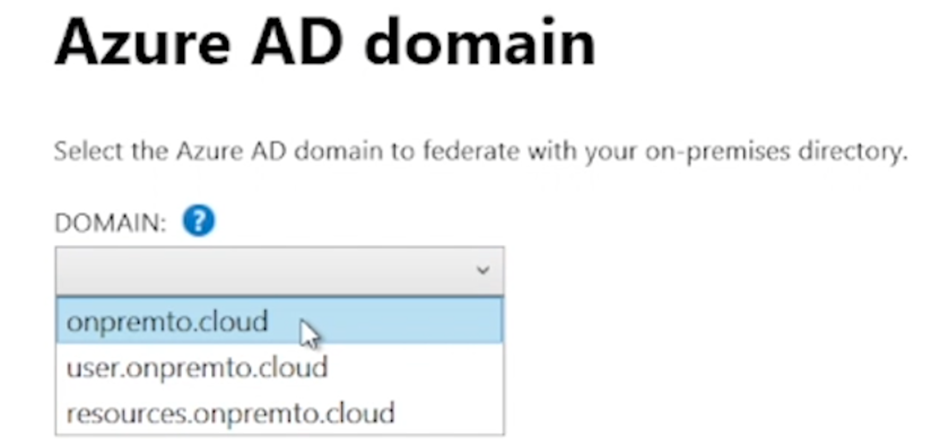
Select domain which should be federated. In most cases this your UPN domain, or your primary SMTP address domain.
After this step all steps should be clear an AAD-Sync connector will be installed successful for all your selected forests.
Now AAD-Connect wizard will verify connectivity with ADFS and test authentication.
Exchange resource forest operations
Exchange resource forest configuration brings a lot of complexity into your environment. A hybrid resource forest brings even more complexity and error sources.
You need to know how to manage all these different objects and how to troubleshoot them.
I will explain main operational tasks and how to manage them.
Creation of Users and Resources
As mentioned before all users are authenticated in the User forest. So every interactive authentication needs to be authenticated through the User forest and every non interactive is authenticated through Resources forest.
Interactive users must be created via DSA.msc, or via PowerShell in the User forest.
Non Interactive users must be created in the same way as interactive users, but their account will be automatically deactivated during mail enablement.
This sample script creates a user in the user forest and moves it to a target OU:
Write-Host 'Enter Firstname of the user : ' -ForegroundColor Cyan$firstname = Read-HostWrite-Host 'Enter Surname of the user : ' -ForegroundColor Cyan$surname = Read-HostWrite-Host 'Please enter a password for the user : ' -ForegroundColor Cyan[System.Security.SecureString]$password = Read-Host -AsSecureString$domainupn = 'onpremto.cloud'$targetou = 'OU=UserAccounts,DC=User,DC=onpremto,DC=cloud' New-ADUser -Surname $surname -Name $firstname -DisplayName ($firstname+' '+$surname) -UserPrincipalName ($firstname+'.'+$surname+'@'+$domainupn) -PasswordNeverExpires $true -Enabled $true -AccountPassword $password -SamAccountName ($firstname+'.'+$surname) -ErrorAction stopWrite-Host 'Sucessfull created '($firstname+' '+$surname) -ForegroundColor greenMove-ADObject -Identity ('CN='+($firstname+'.'+$surname)+',CN=Users,DC=User,DC=onpremto,DC=cloud') -TargetPath $targetouWrite-Host 'Sucessfull created '($firstname+' '+$surname) -ForegroundColor greenYou can also download my user provisioning script from my github repository.
Creation of linked mailboxes
A user mailbox has an active AD object in the “User” forest and an inactive AD object in the “Resource” forest. You need to create an AD object in the “User” forest and then “Mail Enable” this user in the “Resource” forest by using Exchange-Admin Center (ECP), or Exchange Management Shell.
Linked Mailbox enablement in ECP
In Exchange admin center you need to select “Linked Mailbox” instead of “User Mailbox”.
Select the forest in which your user object is located in.
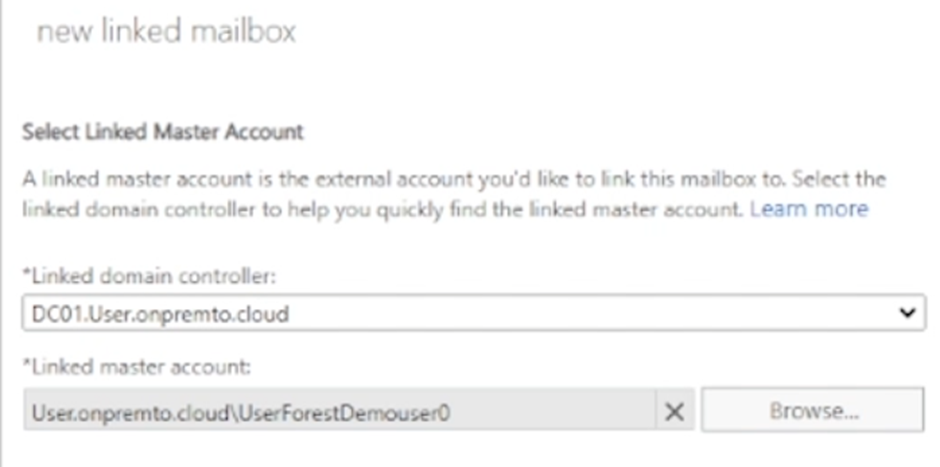
In the next step select the domain controller from your “User” forest and the “Linked Master Account” of the user from your “User” forest. This step will create an AD object in the “Resource” forest and add ms-DS-ConsitencyGUID, with the value of “User” forest.
Now you need to configure mailbox-information. If you want to have a good visibility on your resource objects, simply copy the whole information from your user forest.
Don’t forget to change the UPN to a routeable one.
You can add some additional information to identify the mailbox.
You can select target mailbox database and address book policy, if required.
Write-Host 'Loading Exchange-Snap-In' -ForegroundColor DarkGrayWrite-Host 'Looking for Exchange-Modules' -ForegroundColor DarkGray #Add Exchange snapin if not already loaded if (!(Get-PSSnapin | where {$_.Name -eq "Microsoft.Exchange.Management.PowerShell.E2010"})) { Write-Verbose "Loading the Exchange 2010 snapin" try { Add-PSSnapin Microsoft.Exchange.Management.PowerShell.E2010 -ErrorAction STOP } catch { #Snapin not loaded Write-Warning $_.Exception.Message EXIT } . $env:ExchangeInstallPath\bin\RemoteExchange.ps1 Connect-ExchangeServer -auto -AllowClobber Write-Host 'Enter Firstname of the user : ' -ForegroundColor Cyan$firstname = Read-HostWrite-Host 'Enter Surname of the user : ' -ForegroundColor Cyan$surname = Read-HostWrite-Host 'Please enter a password for the user : ' -ForegroundColor Cyan[System.Security.SecureString]$password = Read-Host -AsSecureString$domainupn = 'onpremto.cloud'$targetou = 'OU=UserAccounts,DC=User,DC=onpremto,DC=cloud' New-ADUser -Surname $surname -Name $firstname -DisplayName ($firstname+' '+$surname) -UserPrincipalName ($firstname+'.'+$surname+'@'+$domainupn) -PasswordNeverExpires $true -Enabled $true -AccountPassword $password -SamAccountName ($firstname+'.'+$surname) -ErrorAction stopWrite-Host 'Sucessfull created '($firstname+' '+$surname) -ForegroundColor greenMove-ADObject -Identity ('CN='+($firstname+'.'+$surname)+',CN=Users,DC=User,DC=onpremto,DC=cloud') -TargetPath $targetouWrite-Host 'Sucessfull created '($firstname+' '+$surname) -ForegroundColor green Write-Host 'Please enter credentials for the User forest : ' -ForegroundColor Cyan$linkedcred = Get-CredentialEnable-Mailbox -Identity ($firstname+'.'+$surname)Get-User -Identity ($firstname+'.'+$surname) | Set-User -LinkedMasterAccount ('user\'+($firstname+'.'+$surname)) -LinkedDomainController 'dc01.user.onpremto.cloud' -LinkedCredential:$linkedcredWrite-Host 'Sucessfull created '($firstname+' '+$surname) -ForegroundColor greenDon’t forget to to replace the values with your own!
Creation of Shared-Mailboxes and Resource-Mailboxes
All Shared, Room and Equipment mailboxes are located in resource forest only and have no active AD-Object.
You can manage these objects directly in Exchange Admin Center of your “Resource” forest, or via PowerShell.
I would really recommend to create a „shadow“ AD-Object for “Resources” also in your “User” AD, but for sure this is not required.
Migration of Users and Resources
In a hybrid environment you may need to move your User-, Room-, Equipment- and Shared-Mailboxes to Exchange Online. For this purpose you can simply create a migration batch in Exchange Online and do it more than less automatically.
But what is you cannot use this feature because of different infrastructure issues? Visit Demystify Exchange-mailbox migration (mccloud.cloud)
Exchange forest decommissioning
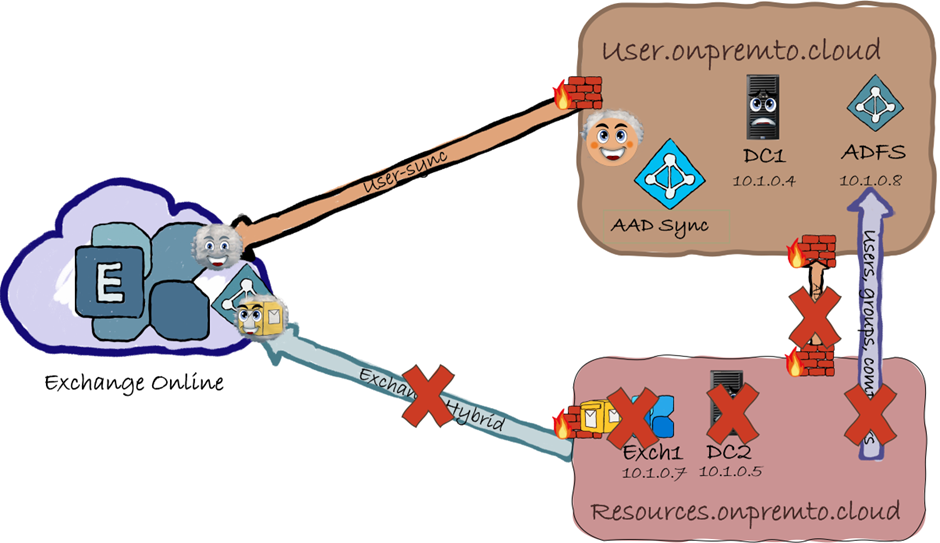
After several years of operating an Exchange-Hybrid environment with a resource forest, your organization is decided to move to cloud only. In this case you must decommission the whole hybrid-environment and move to cloud only.
This scenario is very complicated and Microsoft does not recommends and supports, decommissioning of Exchange-Hybrid-Environment.
So I will explain it as detailed as possible. So you can try to do it in a test environment.
For this purpose I have uploaded a video on you tube with each single step.
Prerequisites
Before you start with decommissioning, please complete following checklist:
1. You need a two way trust between all user and resource forests.
2. You need to have domain admin credentials for ALL forests.
3. Cleanup all unused mailboxes, rooms, equipment and distribution lists, to minimize migration effort.
4. Make sure that you have no applications, or services using on-prem Exchange-Environment for mail relaying.
5. Migrate all certificates which were issued in the Resource-Forest to your User-Forest
6. Migrate any kind of MFA-Solutions from your Resource-Forest to your User-Forest.
7. Migrate all Computer-Objects by using Microsoft Active Directory Migration tool.
8. Install Exchange-Management-Server in your User-Forest.
9. DISABLE ADFS User-Federation
Resource-Objects migration
Migration of AD-objects from Resource forest to user forest is the most critical and essential points.
All AzureAD objects are already synchronized and identified by immutableID. ImmutableID is generated from the objectGUID of the Resource-Forest. ObjectGUID is a uniqa system value and can not be copied or migrated.
BUT!
ImmutableID is generated not directly from the objectGUID, but from ms-DS-consistencyGUID attribute of each AD-object.
So we need:
- simply create all Resource-Objects in the User-Forest
- generate ms-DS-consistencyGUID from the Resource-forest objectGUID
- change ms-DS-consistencyGUID property in the User-Forest with the value of Resource-forest
DON’T forget! You need to change ms-DS-consistencyGUID of every Shared, Room, Equipment and DistributionGroup object!
Exchange Management Server
Before start with Object-Migration you need to extend your schema in the User-forest and install Exchange Management Server (console). You can install this console on any server in your User-Forest domain joined server. So if you don’t want to have an extra server for this purpose, you can simply install it on any server.
Before you start with Exchange management console
If you have no Exchange Organization in your AD forest Exchange Management console will not able to connect by default.
Run this script located in “C:\Windows\Program files\Microsoft\Exchange Server\V15\Script” depends on your installation location. For this step make sure that you are Domain Administrator because this script will prepare Domain and Schema for Exchange Management operation.
After the script run successfully you will find new Security-Groups in your forest.
Simply add all your futured Exchange Administrators to
Recipient Management EMT
AD security Group and start with Exchange Operations
Benefits of an Exchange management server
- If you are using an Exchange management server, you will never have a proxy address conflict
- This will reduce operational costs enormously
- You have a supported environment
Object Migration
Following steps will describe the whole process of “Resource” forest to “User” forest migration:
1. Start Exchange Management-Shell in your User-Forest
o Add-PSSnapin *RecipientManagement2. Export all mailboxes in your Resource-Forest by running
o Get-Mailbox -ResultSize unlimited | Out-File 'C:\temp\remote-mailbox-export.csv'3. Copy the export file to your Exchange Management-Server in any location you can access.
4. Read the export into a variable. Now you have all Mailboxes from the Resource-Forest imported and can start with creation of Remote-Mailboxes in your User-Forest.
o Enable-RemoteMailbox -Identity $remotemailbox.SamAccountName -RemoteRoutingAddress $remotemailbox.RemoteRoutingAddress -PrimarySmtpAddress $remotemailbox.PrimarySmtpAddress5. Set all custom attributes for that mailbox.
o Set-RemoteMailbox -Identity $remotemailbox.UserPrincipalName -EmailAddressPolicyEnabled $false -SimpleDisplayName $remotemailbox.simpledisplayname -UserPrincipalName $remotemailbox.userprincipalname -CustomAttribute1 $remotemailbox.CustomAttribute1 -CustomAttribute2 $remotemailbox.CustomAttribute2 -CustomAttribute3 $remotemailbox.CustomAttribute3 -CustomAttribute4 $remotemailbox.CustomAttribute4 -CustomAttribute5 $remotemailbox.CustomAttribute5 -CustomAttribute6 $remotemailbox.CustomAttribute6 -CustomAttribute7 $remotemailbox.CustomAttribute7 -CustomAttribute8 $remotemailbox.CustomAttribute8 -CustomAttribute9 $remotemailbox.CustomAttribute9 -CustomAttribute10 $remotemailbox.CustomAttribute10 -CustomAttribute11 $remotemailbox.CustomAttribute11 -CustomAttribute12 $remotemailbox.CustomAttribute12 -CustomAttribute13 $remotemailbox.CustomAttribute13 -CustomAttribute14 $remotemailbox.CustomAttribute14 -CustomAttribute15 $remotemailbox.CustomAttribute156. Get the GUID of original AD object from the Resource-forest by using Get-ADUser on the Resource-Forest Domain controller. User -Server property for that.
o $guid = Get-ADUser -Identity $remotemailbox.SamAccountName -Server $GLOBAL:sourceforest -Properties *7. Now change the ms-DS-consitencyGUID in your of your User-Forest object to the Resource-Forest object.
o Get-ADUser -Identity $remotemailbox.SamAccountName | Set-ADUser -Replace @{ "ms-Ds-ConsistencyGuid" = $guid.ObjectGUID.ToByteArray()}8. Now simply repeat this steps for all Mailboxes!
I wrote this script to migrate all Resource-Object to User-Forest.
exchangeresourceforest/resouce-forest-migration.ps1 at main · viktorahorner/exchangeresourceforest (github.com)
So you can simply run this script on your Exchange Management server and migrate all Resource-Forest object to the User-Forest. Or, just use it as a basis for your own migration.
Disable Exchange Hybrid configuration
1. Enable staging mode on your User-Forest AAD-Sync connector. This will disable all write operations into your Azure-AD.
After we have migrated all Resource- and Computer-Object from the Resource-Forest to User-Forest we need to disable Exchange Hybrid Configuration.
· Remove the Service Connection Point (SCP) values on your Exchange servers
Get-ClientAccessService | Set-ClientAccessService -AutoDiscoverServiceInternalUri $Null· Prevent the hybrid configuration objects from being recreated in the future
Remove-HybridConfiguration· Disable OAuth on OnPrem-Server
Get-IntraorganizationConnector -Identity ‘HybridIOC - c608be70-1247-49e4-8d4f-f9666830e243’ | Set-IntraOrganizationConnector -Enabled $False· Disable OAuth on ExchangeOnline
Get-IntraorganizationConnector -Identity ‘HybridIOC - 6aac2c71-a960-4cc4-a47b-ada947bc4dd9’ | Set-IntraOrganizationConnector -Enabled $False·
Disable inbound and outbound connectors created by the Hybrid Configuration Wizard
Note: Disabling Exchange Hybrid will stop the synchronization of Exchange-related data between on-premises Exchange and Exchange Online, which may impact Exchange functionality in your environment. Therefore, it is recommended to plan and test the impact of disabling Exchange Hybrid before doing so.
Change AAD-Sync
Exchange Hybrid is now disabled and we must change Azure-Active-Directory Synchronization to a single forest.
1. Install a second AAD-Sync server in your “User” forest and connect only User forest directory.
a.
2. Configure all optional features which were configured on the first AAD-Sync server before.
a.
3. Wait until the installation is finished and run first AAD-SyncCycle on your new AAD-Syn Server.
4. After the Data Export Task has been completed.
Check errors logs if you have some synchronization errors.
Some object my cause errors so check these bevore applying new steps. In my case these objects were some artifacts and I don’t need to migrate them.
5. Now you can validate if your Azure AD objects are originated from the User-Forest and not from Resource-Forest.
If your resource objects are still in sync you have successfully migrated Resource-Forest to User-Forest.
Disable AD-trust
Our AD-Objects are now synchronized from our User-Forest and we can simply remove the Resource-Forest trust and shutdown whole Resource-Forest environment.
1. Open AD Domains and trust of your Resource-Forest.
2. Open properties and remove the trust with your User-Forest.
3. Open DNS management and remove Conditional forwarder for the User-Forest.
4. Repeat these steps for the User-Forest.
5. Validate if AAD-Synchronization is still working
NOW you can safe switch off your resource forest environment and prepare the next if you want to get cloud only!
Disable Directory sync
This step requires a lot of preparation and planning and can not be applied just so.
Follow this checklist before applying the “Cloud Only” step:
1. Make sure that you have no Kerberos-Authenticated applications. They will not be able to authenticate to your cloud environment.
2. Make sure that you have synchronized all required objects to Azure-AD.
3. Make sure that you have no 3rd party MFA-solution in place.
4. Make sure that you have enrolled MS Authenticator app to your mobile phone
5. Be sure that you really want it!
Run following steps:
1. Connect-MsolService2. Set-MsolDirSyncEnabled -EnableDirSync $falseIn the column “On-premises synchronized” is now switched to No, it means that we are cloud only now.
Depends on amount of your objects, it will take up to 3 days to change all objects to cloud only.
I hope you have enjoyed this demystification article.
If you have any questions just leave me a feedback.














Comments